
Creating Contracts
LaunchBay's electronic document signing functionality lets you turn PDFs and other documents into signable contracts that clients can complete directly in their portals.
Before you can attach contracts to portal tasks in your LaunchBay projects, you must create the contracts you'll be using. This article will provide a complete walkthrough of how to do so.
📢 Note: For clients to be able to sign and submit the contracts you create, you must add them to tasks using LaunchBay's "Contracts" task option. Click here to learn more.
How to Create Contracts in LaunchBay
To create contracts that clients can sign electronically, navigate to the "Contracts" page of your LaunchBay admin dashboard. This page is where you can create and manage the contracts available to be filled out and/or signed within tasks.

Step 1: Upload a PDF or Image File
From the "Contracts" page of your account, click the "Create Contract" button. Next, drag the PDF or image file for the contract you'd like to make electronically signable into the window and click "Upload."
Once your contract is uploaded, you can click the title at the top of the editor to rename it if needed.

Step 2: Configure Your Fields
After uploading your contract, click "Edit Fields" to bring up the field editor. In the editor, you can add new fields, edit existing fields, and specify which fields clients are responsible for completing and which ones you or your team members are.
The sections below provide an overview of the options and customizations available when configuring fields in your contracts.
Add New Fields
You must set at least one fillable field in the contracts you create. The field editor includes six fields you can add to a contract and assign to clients or team members: Signature, Initials, Checkbox, Text Field, Date Field, and Select Box.
Click and drag any field type from the panel and drop it directly onto your contract wherever you need it.

👋 Tip: The "Text Field" option in LaunchBay contracts allows you to pre-fill values unique to each project. Using this functionality, you can pre-populate fields with information specific to that project and avoid clients or team members entering it manually. Click here to learn more.
Text Field: Formats & Custom Labels
The Text Field option allows you to collect specific information from signers. Text fields are open-ended, so we suggest adding a custom label to clarify what you're requesting.

To create a custom label, click on a text field and in the "Label" field, enter the text you want to appear to clients and team members when they complete the contract.
Text Fields
Text fields support conditional formats to specify the type of input a field should accept. Available formats include: Numbers, Letters, Email, Phone, Age, Zip Code, and more. To set a format, click the text field and select your preferred option from the "Format" dropdown in the Edit Field Settings.
Select Box Field
The Select Box field type lets you add a dropdown to your contract that signers can use to choose one option from a predefined list. To configure it, click the Select Box field and add your Options in the field settings panel.
Add or Change Placeholder Recipients
Placeholder recipients allow you to specify whether a client or team member is responsible for completing the fields in a contract. The first field you add to a contract will only have the default "Client" placeholder, but adding additional types of recipients is straightforward.
To add a new placeholder, expand the plus sign + in the Roles section in the left-hand menu. This will open a panel to name your role, select the type, and role color.

Do you require contracts to be counter-signed by you or a team member?
Create a separate role for your team. To keep things simple, we suggest naming it "Team" and setting its type to Team.
Once you've created your roles, click the role you want to build fields for — each field option will display the role's color so you can easily track which role you're building for.

Require multiple clients to sign a single contract?
Create a separate role for each client who needs to sign. For example, if your contract requires three clients to sign, add roles for "Client 1," "Client 2," and "Client 3," and assign each one its own signature field.
Adjust Your Signing Order
With Custom Signing Order, you can control the order in which contracts are signed—whether you're using a saved template or creating a one-off contract. This allows your team to decide who signs first, second, or last, depending on your internal approval process or client workflow.
To enable signing order, add more than two signer fields to your contract. Then, click the Signing Order toggle—this will enable signing order and drag handles for you to set your preferred order.

👋 Tip: When using Contract Signing Order, Task Assignee Order automatically mirrors the signature sequence—so everyone can clearly see who’s signed, who’s up next, and who’s still pending, all in one organized workflow.
Step 3: Save Your Contract & Attach It To Tasks
After configuring all the necessary fields, click "Save" button in the top right corner. Once you do so, the contract will be available in your library and can be attached to tasks in your LaunchBay projects and templates.
Unique Contract per Project? Use Single Use Contracts!
If a standard contract template doesn’t work across all projects, a single-use contract gives you an easy way to add a unique document to one task. It belongs to that task only, isn’t saved to your contract library, and doesn’t appear anywhere else.

Instead of attaching a contract to a task in a project template, leave the Contract field blank when setting up the task. Then, once the project is live, add the contract to the task:
- Open the task and click Contracts.
- Under Add a contract, choose Upload a PDF.
- Upload your PDF, name it in the editor’s header, and drag on the signature and form fields. Adjust the signing order if needed.
- Click Use Contract to attach it to the task.
- Assign who fills out each part, then click Done.
Employees can create and edit their own single-use contracts. Admins and managers can edit any single-use contract on the team.
👋 Tip: Ready to start sending your contracts to clients? Click here to learn more.
Updating Contracts
Below are two options for updating contract templates you create.
📢 Note: Changes you make to an existing contract (for example, adding or editing fields or replacing the file) only apply to draft tasks and template-based automations going forward. Tasks that are already active in live projects keep the original version.
Replace the file used in a contract to retain fields
When your terms, pricing, or other information in a contract changes, you can update the contract in place. Click "Replace Contract File," upload your new PDF, and your existing fields will be kept. Reposition or reconfigure any fields as needed to match the new document layout.

📢 Note: Replacing a contract does not affect tasks that are already active in live projects. Only draft tasks and template-based automations will use the updated contract moving forward.
Create a new, different version of a contract by duplicating
If you want a new version of a contract but need to keep the original as-is, duplicate it instead of rebuilding it from scratch. For example, you might want to add or update fields, adjust signer roles, or use an updated PDF while keeping the fields you've already set up.
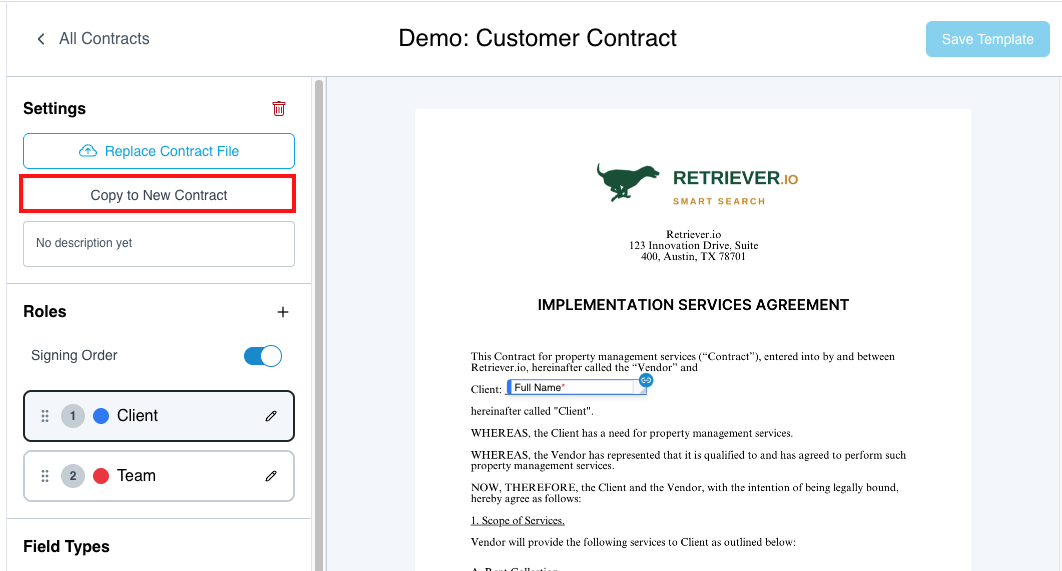
- Open the contract from the Contracts page.
- Click "Copy to New Contract."
- Make your changes to the fields and roles. To use an updated document, click "Replace Contract File" and upload your new PDF.
📢 Note: Duplicating a contract doesn't affect the original. To use the new contract in existing tasks, in either active projects or templates, remove the original contract from the task and attach the new one.